How to Add a New User in Windows 8
Introduction
Windows 8 allows multiple users to share the same computer using different accounts. This allows each user to have their own location where they can store personal information such as documents, pictures, videos, saved games, and other files so that they are not mixed in with the files of other users on the same computer. Having multiple accounts also plays a strong role in Windows Security. It is advised that each account on the computer be setup as a Standard User, which has limited permissions, so that it is harder for malware to infect the computer. You should then create a separate account that will be for the Administrator of the computer. This account, though, would only be used to administer the computer as necessary and would not be used as a day-to-day account. Using this security plan significantly reduces the chance of your computer becoming infected.
Windows 8 also introduces the ability to create and login as a Local account or a Microsoft account. A Local account is an account that is local to your computer and is not integrated into any of Microsoft's online services. This account is the same as what was used in previous Windows versions. A Microsoft account, which was previously known as a Windows Live ID, is an online account that you register with Microsoft and that allows you to integrate all of Microsoft's online services into Windows 8. These services include the Windows Store, SkyDrive, Calendar, Hotmail, and the ability to synch your account settings and preferences to other Windows 8 machines you may use. Ultimately, there is no wrong choice when selecting the type of account to use as you have the ability to switch between a Microsoft account and a local account at any time.
How to create a user in Windows
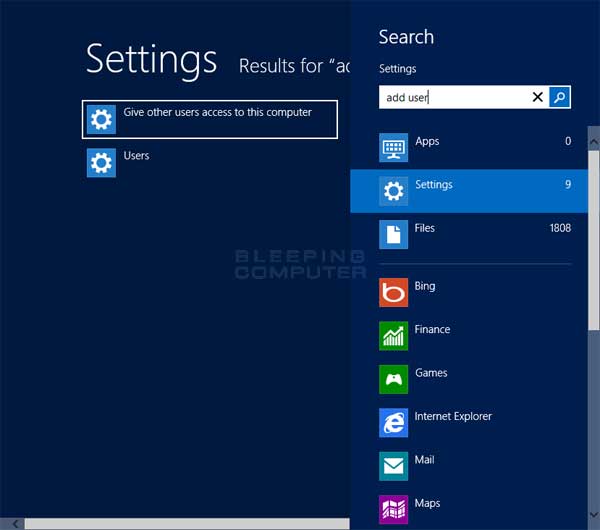
To create a new user in Windows, please make sure you are logged in with an account that has Administrator privileges. Now, go to the Windows 8 Start Screen and type Add User. When the search results appear click on the Settings category as shown below.

Now click on the option labeled Give other users access to this computer, which will open the User Settings screen.

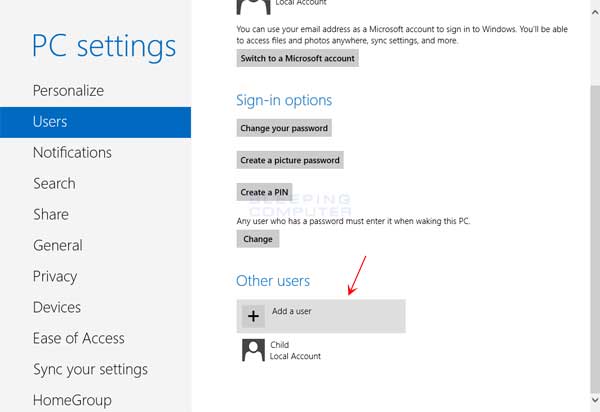
Scroll down and click on the Add User option as shown above. You will now be at a screen prompting you to enter the user's email address.

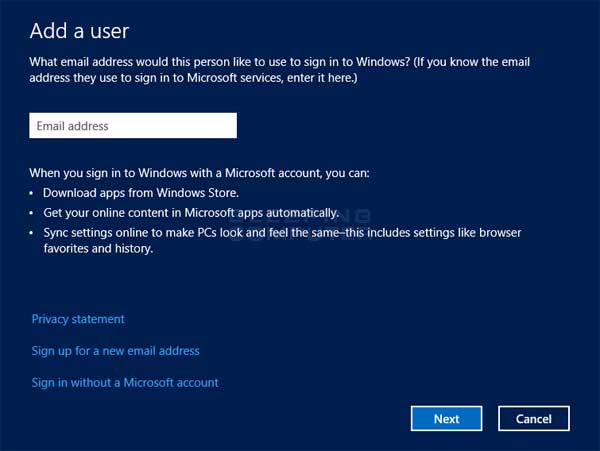
By default, the above screen prompts you to enter an email so that you create a Microsoft account. If you wish to create a Microsoft account, enter your email address and click on the Next button. If the email address is not an existing Microsoft account you will be prompted to register one. When the registration process is completed, Microsoft will send an email to the inputted email address. In this email will be a link that you need to click on in order to verify that you want this Microsoft account used on this computer.
If you do not wish to use a Microsoft account, you should instead click on the Sign in without a Microsoft account option in the screen above. You will be brought to a screen where Windows will ask again if you are sure you wish to make a Local account. Click on the Local account button and this will bring you to a new screen where you need to input the information you wish to use for the Local account. At this screen you need to fill in the desired user name, password, and a hint that will be used to help you remember your password. When you are done filling in the information, please click on the Next button.
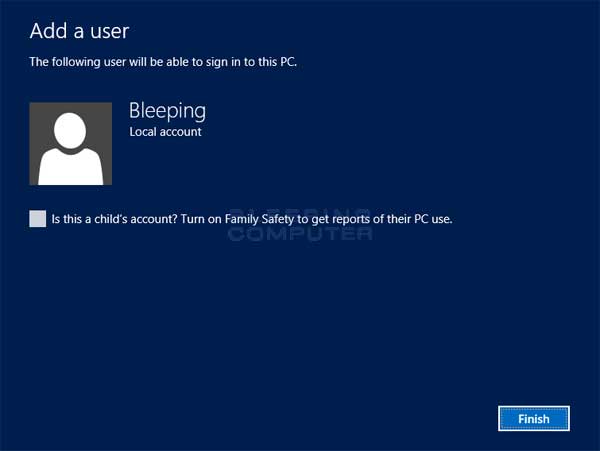
Your account should now be created and you will see a confirmation screen similar to the one below.

If the new account belongs to a child and you wish to enable Family Safety, please place a check mark in the checkbox and click on the Finish button.
Your new account has now been created.
How to Add a New User in Windows 8
Source: https://www.bleepingcomputer.com/tutorials/create-new-user-account-in-windows-8/
0 Response to "How to Add a New User in Windows 8"
Post a Comment